In this blog post I will try to describe the different steps I have been thru to plan, design and build the prototype of my QuadCopter. There will be coming some more blog posts later on describing how to get the QuadCopter running, programming it, tuning it etc.
This blog post is divided into 3 parts
- What is a QuadCopter
- Brushless motors
- Propellers
- Roll, Pitch and Yaw
- ESC – Electronic Speed Controller
- Battery
- The frame
- Frame configuration
- Inertial Measurement Unit
- Controller electronics
- Initial decisions
- Theoretical calculator
- Conclusion
What is a QuadCopter
In short terms a QuadCopter is what the name says a “copter”-like device with four rotors (quad). You might have seen one in action before, as they are being commercialized for police and monitoring use. You can also find them as toys, fx the AR Drone or even universities have been playing with them, developing swarms with them.
A swarm of nano copter
QuadCopters can be found and built in many different sizes. All from the tiny ones that isn’t much larger than a CD ROM and up to QuadCopters with a motor-to-motor length of more than a meter.
To plan and build a QuadCopter there is a lot of terms you need to understand. So before planning my design I searched the internet for good resources for DIY QuadCopter and found the following links to be the best:
To give you a better understanding of what a QuadCopter contains I will now go thru some of the parts it contains.
As I said QuadCopters do have 4 motors with a propeller each. Most of the times the so called Brushless Motors are used to drive the propellers.
Brushless motors are a bit similar to normal DC motors in the way that coils and magnets are used to drive the shaft. Though the brushless motors do not have a brush on the shaft which takes care of switching the power direction in the coils, and this is why they are called brushless.
Instead the brushless motors have three coils on the inner (center) of the motor, which is fixed to the mounting. On the outer side it contains a number of magnets mounted to a cylinder that is attached to the rotating shaft. So the coils are fixed which means wires can go directly to them and therefor there is no need for a brush.

The reason why QuadCopters use brushless motors instead of normal DC motors is the much higher speeds and less power usage for the same speed. The brushless motors are more efficient as there is no power lost as there is in the brush-transition on the DC motors.
On this diagram of the brushed motor you will see that it is the coil that is rotating instead of the magnets as on the brushless.
Brushless motors come in many different varieties, where the size and the current consumption differ. When selecting your brushless motor you should take care of the weight, the size, which kind of propeller you are going to use, so everything matches up with the current consumption.
When looking for the brushless motors you should notice the specifications, especially the so called “Kv-rating”. The Kv-rating is an indication on how many RPMs the motor will do if provided with x-number of volts. The RPMs can be calculated in this way: RPM=Kv*U
Propellers
On each of the brushless motors there are mounted a propeller. You might not have noticed this on the pictures, but the 4 propellers are actually not identical. If you have a look at the CrazyFlie picture above you will notice that the front and the back propellers are tilted to the right, while the left and right propellers are tilted to the left.

This reason for this is that the motor torque of and the law of physics will make the QuadCopter spin around itself if all the propellers were rotating the same way, without any chance of stabilizing it. By making the propeller pairs spin in each direction, but also having opposite tilting, all of them will provide lifting thrust without spinning in the same direction. This makes it possible for the QuadCopter to stabilize the yaw rotation, which is the rotation around itself.
The propellers come in different diameters and pitches (tilting). You would have to decide which one to use according to your frame size, and when that decision is made you should chose your motors according to that.
Some of the standard propeller sizes used for QuadCopters are:
EPP1045 – 10” diameter and 4.5” pitch – this is the most popular one, good for mid-sized quads
APC 1047 – 10” diameter and 4.7” pitch – much similar to the one above
EPP0845 – 8” diameter and 4.5” pitch – regularly used in smaller quads
EPP1245 – 12” diameter and 4.5” pitch – used for larger quads which requires lot of thrust
EPP0938 – 9” diameter and 3.8” pitch – used in smaller quads
In general you should select your propeller according to the following four tips:
The diameter of the propeller indicates how much air the propeller will be able to “move” while the pitch indicates how much air the propeller moves all the time – not said that you can use this in any way to calculate the air moved.
The larger diameter and pitch the more thru the propeller can provide. But be-aware that a large pitch makes it much harder for the motor to drive it, it requires much more power, but in the end it will be able to lift more weight.
When using high RPM motors you should go for the smaller or mid-sized propellers
When using low RPM motors you should go for the larger propellers as you can run into troubles with the small ones not being able to lift the quad at low speed (RPM)
A faster rotating propeller (small diameter and small pitch) is used when you have a motor that runs at a high RPM (Kv > 1000) and can provide a decent amount of torque.
A slower rotating propeller (longer or larger pitch) is used when you have a motor that manages fewer revolutions but can provide more torque.
Roll, Pitch and Yaw
For this matter let’s just sum up what Roll, Pitch and Yaw is, as we are going to use these terms much more.
Roll, Pitch and Yaw is some well used terms from the aircraft terminology. The terms are used to describe the objects orientation around each of its axis. Have a look at the picture below and I think you will understand the terms.
ESC – Electronic Speed Controller
As the brushless motors are multi-phased, normally 3 phases, you can’t just apply power to it to make it spin. The motors requires some special phase-control electronics that is capable of generating three high frequency signals with different but controllable phases, but the electronics should also be able to source a lot of current as the motors can be very “power-hungry”.

In this case we got the Electronic Speed Controllers, known as ESC’s. The ESCs is simply a brushless motor controller board with battery input and a three phase output for the motors. For the control it is usually just a simple PPM signal (similar to PWM) that ranges from 1ms (min speed=turn off) to 2ms (max speed) in pulse width. The frequency of the signals does also vary a lot from controller to controller, but for a QuadCopter it is recommended to get a controller that supports at least 200Hz or even better 300Hz PPM signal, as it should be possible to change the motor speeds very quickly to adjust the QuadCopter to the stable position. It is also possible to get ESCs that is controlled thru OneWire of I2C. These tends to be much more expensive though, but sometimes it is also possible to “mod” other ESCs to add the I2C feature.

ESCs can be found in many different variants, where the source current is the most important factor. You should always chose an ESC with about 10A or more in sourcing current as what your motor will require.
Another important factor is its’ programming facilities, as some ESCs support range programming while others do not. This means that with some ESCs you don’t necessarily have to use the “1ms to 2ms” range, but you can adjust it to your own needs – this is especially useful when we are going to make our own controller board.
Battery
All this leads to the battery, the power source for the whole device. For the battery two types can be used, whereof one of them is highly recommended. The NiMH and the LiPo. I won’t say much about the NiMH as most communities tells us to stay away from these for driving QuadCopters as they first and foremost are not able to provide enough current and secondly they weight a lot more than LiPo batteries when they have the necessary current ratings.
Instead we should talk about LiPo batteries, but in this world there are also a lot of different variants of these too. LiPo batteries can be found in packs of everything from a single cell (3.7V) to over 10 cells (37V). The cells are usually connected in series, making the voltage higher but giving the same amount of amp-hours.
For a QuadCopter you should go after the 3SP1 batteries which means 3 cells connected in series as 1 parallel (just forget the parallel, as it has no sense because we just use 3 cells in series). This should give us 11.1V but at fully charged it actually gives us around 12V instead.
For a brushless motor with a Kv-rating of 1000, this gives us a maximum of 12000 rounds per minute. This number is totally fictive as the battery voltage will drop immediately to around 11.1V (at fully charged state) when current is being drained. Anyways, this gives us a good idea about how fast the propellers will be spinning!

As for the battery capacity regards you should make some calculations on how much power your motors will draw and then decide how long flight time you want and how much influence the battery weight should have on the total weight. A good rule of thumb is that you with four EPP1045 propellers and four Kv=1000 rated motor will get the number of minutes of full throttle flight time as the same number of amp-hours in your battery capacity. This means that if you have a 4000mAh battery, you will get around 4 minutes of full throttle flight time – though with a 1KG total weight you will get around 16 minutes of hover.
Another thing to be-aware of when selecting the right battery is the discharge rate, formerly known as the C-value. The C-value together with the battery capacity indicates how much current you are able to source from the battery. The calculations follow this simple rule: MaxSource = DischargeRate x Capacity
Take the Zippy4000 from the image above, which has a discharge rate of 20C and a capacity of 4000mAh. With this battery you will be able to source a maximum of 20Cx4000mAh = 80A. So in this case you should make sure that the total amount of current drawn by your motors (ESCs) won’t exceed 80A.
To make some more detailed calculations about your specific design I recommend you to visit the free xcopterCalc – Calculator for Multicopters. I will tell more about this in the “Initial decisions” section.
The frame
Every part in a QuadCopter design works together and the frame is the one joining all of them. The frame can be designed in many ways with many different kinds of materials. The important things are to make it rigid and to minimize the vibrations coming from the motors.
A QuadCopter frame consists of two to three parts which don’t necessarily have to be of the same material:
- The center part where the electronics and sensors are mounted
- Four arms mounted to the center part
- Four motor brackets connecting the motors to the arms
There are three kinds of materials that I recommend using for a QuadCopter frame:
- Carbon Fiber
- Aluminium
- Plywood or MDF
Carbon fiber is the most rigid and vibration absorbant of the three materials but is also by far the most expensive.
Most of the times the arms used in QuadCopters are made of hollow aluminium square rails which makes the QuadCopter relatively light weight but still makes it rigid. The problem with these hollow aluminium rails are the vibrations, as they aren’t damped and will therefor vibrate to the center part and maybe mess up the sensor readings.

Instead solid MDF plates could be cut out for the arms as they will absorb the vibrations much better than the aluminium. Unfortunately we have another problem then, as the MDF plates are not very rigid and will break if the QuadCopter falls to the ground.
As for the center part everything from carbon fiber, aluminium or plywood can be used. Plywood is commonly seen as the center part because it is light weight, easy to work with and is reliable and rigid so it can hold the four arms together as required.
The arm length varies a lot from QuadCopter to QuadCopter as it is up to the individual to decide how big he would like his quad to be. In the QuadCopter terminology we use the abbreviation “motor-to-motor distance” to explain the distance for the center of one motor to the center of another motor of the same arm (or in the same direction).

The motor to motor distance decision goes hand in hand with the propeller diameter decision, as you should definitely make enough space between the propellers. Usual QuadCopters with EPP1045 propellers, which means a propeller diameter of 10”, has a motor to motor distance of around 60 cm ~ 24”, though it will be possible to make it less. Others with smaller propellers, fx with a diameter of 8” or less, will be able to have a motor to motor distance of around 12”.
Frame configuration
While the + configuration looks like this:
The difference is how the motors have to be controlled. For the + configuration the motor controlling is fairly simple as you just have one motor assigned to each direction. The negative aspect of the + configuration though is that you only have a single motor to provide extra thrust (speed up) when you want to move to another direction. In the X configuration you will always have two motors working together on changing direction.
IMU – Inertial Measurement Unit
Wow, I think this post is getting really big, and I haven’t even talked about the fun part yet – the IMU.
The Inertial Measurement Unit is the sensor system of the QuadCopter. The main purpose of the Inertial Measurement Unit is to calculate the orientation of the quad – the three orientation angles, Roll, Pitch and Yaw. These angles are then fed into some controlling electronics that uses those angles to calculate the required changes in the motor speeds.
The IMU consists of at least 6 sensors, also known as 6DOF. These sensors should be a 3-axis accelerometer and a 3-axis gyroscope. Sometimes another sensor, a 3-axis magnetometer, is added for better Yaw stability.

The accelerometers measures acceleration as the name indicates. Now you would think, “Why the heck do we need to measure acceleration to know the orientation?”, but yet again there is another law of physics – the gravity. The gravity is actually a downwards acceleration towards the center of earth, which to all objects makes a downward force keeping the objects on the surface. The accelerometer is actually measuring force, so the downwards gravity acceleration will also be measured by the accelerometer.
As the accelerometer sensor can measure the acceleration in three directions we can actually calculate how the accelerometer is oriented against the surface.

Fx when the accelerometer is held as the image above, the X axis will show positive 1g, while all the other two axis will show 0g.
Now the next question rises, “Why isn’t the accelerometer then enough to measure the orientation?”. The problem lies in the way the accelerometer works, because it isn’t very stable. If only the accelerometer were used to calculate the orientation even the smallest movements of the accelerometer will mess up the orientation. So if mounted on a QuadCopter with vibrating motors it will be no good.
Instead we use a gyroscope to address this problem. A gyroscope measure angular velocity, in other words the rotational speed around the three axis. The output of a gyroscope is given in radians per second or degrees per second. With both the accelerometer and gyroscope readings we are now able to distinguish between movement/vibration going up, down, left or right or rotation of the sensor, which is what we would like to know.
Final question, “Then why didn’t we just use the gyroscope when it can tell us the rotational movement?”. Yet again the problem lies in how the sensor works. The gyroscope tends to drift a lot, which means that if you start rotating the sensor, the gyroscope will output the angular velocity, but when you stop it doesn’t necessarily go back to 0 deg/s. If you then just used the gyroscope readings you will get an orientation that continues to move slowly (drifts) even when you stopped rotating the sensor.
This is why both sensors has to be used together to calculate a good and useful orientation.
For the Yaw rotational movement the accelerometer can’t be used as the reference sensor as it could with the Roll and Pitch movement. Instead a magnetometer is sometimes used. A 3-axis magnetometer measures the magnetic field that affects the sensor in all three directions. As the earth contains a magnetic field on the North- and South Pole, the magnetic sensor can be used to determine where north and south is located. The locations of these poles can then be used as a reference together with the angular velocity around Yaw from the gyroscope, to calculate a stable Yaw angle.
I won’t go more into details on how these calculations are done in this post. I will write another post soon with more details on these algorithms.
The 3 different sensors usually come in QFN or BGA packages which make it hard to do your own development with them. Instead people usually buy an IMU sensor board with 6DOF or 9DOF or even buy a complete IMU unit with processor and sensors.
Here is a list of some of the commercial available IMU sensors boards and units.
IMU sensor boards:
IMU units:
The raw sensor boards I’ve seen in use works either digitally by I2C or by analog. I prefer to use the digital boards as I2C is so easy and fast. Though if you got a fast processor with some good analog inputs capable of sampling fast enough, the analog boards seems to be more inexpensive than the digital ones.
The difference between the IMU sensors boards and the IMU units is that the IMU units contain a microprocessor. Usually it’s a small 8-bit microprocessor which will do the calculation of Pitch, Roll and Yaw by the use of some kind of algorithm. The calculated data will then be put out on a serial bus or sometimes also available by I2C or SPI.
The choice of IMU is going to reflect which kind of controller board you are going to use. So before rushing out buying one of these boards you should read the next section about the controller boards, as some of them do already contain the different sensors.
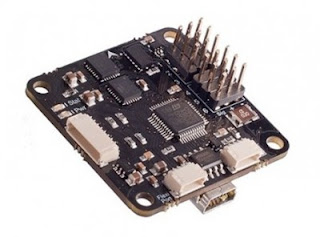
Controlling electronics
QuadCopters can be programmed and controlled in many different ways but the most common ones are by RC transmitter in either Rate (acrobatic) or Stable mode. You can either buy an already commercial available controller board or build one yourself. Someone is also doing a mixup by buying some of the parts, like an Arduino and the sensors but then they make the shield and some of the software themselves.
Here is a list of some of the commercial available controller boards that I have met on my way thru the QuadCopter jungle.
Some of the controller boards already contain the required sensors while other requires you to buy these on a separate board.
The AeroQuad board is fx a shield for the Arduino, either the Arduino UNO or the Arduino MEGA. The AeroQuad board requires the Sparkfun 9DOF stick which is soldered to the shield.
The ArduPilot board contains an ATMEGA328, the same as on the Arduino UNO. Like the AeroQuad shield this board doesn’t contain any sensors either. You would have to buy fx the ArduIMU and connect it to the board to use it.
The OpenPilot is a more advanced board which contains a 72MHz ARM Cortex-M3 processor, the STM32. The board also includes a 3-axis accelerometer and 3-axis gyroscope. Together with the board comes a great piece of software for the PC to calibrate, tune and especially set waypoints for your QuadCopter if you have installed a GPS module – which I will be talking more about in the next section.
As I said earlier QuadCopters are usually controlled in either Rate (acrobatic) or Stable mode. The difference is the way the controller board interprets the orientational feedback together with your RC transmitter joysticks.
In Rate mode only the Gyroscope values are used to control the QuadCopter. The joysticks on your RC transmitter are then used to set the desired rotation rate of the 3 different axes. In this mode you can control your QuadCopters speed of rotation around the 3 axis, though if you release the joysticks it doesn’t automatically re-balance. This is useful when doing acrobatics with your QuadCopter as you can tilt it a bit to the right, release your joysticks, and then your QuadCopter will keep that set position.
For the beginner the Rate mode is a bit hard to start with so instead you should start with the Stable mode. In the Stable mode all the sensors are used to determine the QuadCopters orientation in the air. This orientation is then used to calculate the speed of the 4 rotors to keep the QuadCopter balanced, being plan with the surface. The joysticks on your RC transmitter are then used to set the desired angle for the different axes. So if you would like to move your QuadCopter forward a bit you should simply tilt one of the joysticks so the desired Pitch angle will be changed. When releasing the joysticks the angle will be reset and the QuadCopter will be stable again.
Source


 is a beautiful Beaux-arts building in midtown Manhattan. First...</span>")